AQ

Improving Compliance and Efficiency With Sharepoint Based Contract Management Systems

As you navigate the complexities of contract management system, you’re likely aware of the inefficiencies that can hinder your business’s performance. You’re not alone – many organizations struggle to keep track of contracts, obligations, and renewal dates, leaving them vulnerable to non-compliance risks. But what if you could centralize your contracts in one platform, ensuring easy access and automated workflows? You’d be able to identify potential risks, optimize contract management, and ultimately, improve your business’s overall efficiency. But just how can a SharePoint-based system make this a reality?

Automating Contract Lifecycle Management

Most companies manage hundreds of contracts, each with its own unique set of terms, renewal dates, and stakeholders.

You’re likely no exception, and you know how overwhelming it can be to keep track of every detail.

Manually managing contract lifecycles can lead to errors, missed deadlines, and even revenue loss.

That’s why automating contract lifecycle management is crucial.

Enhancing Visibility and Transparency

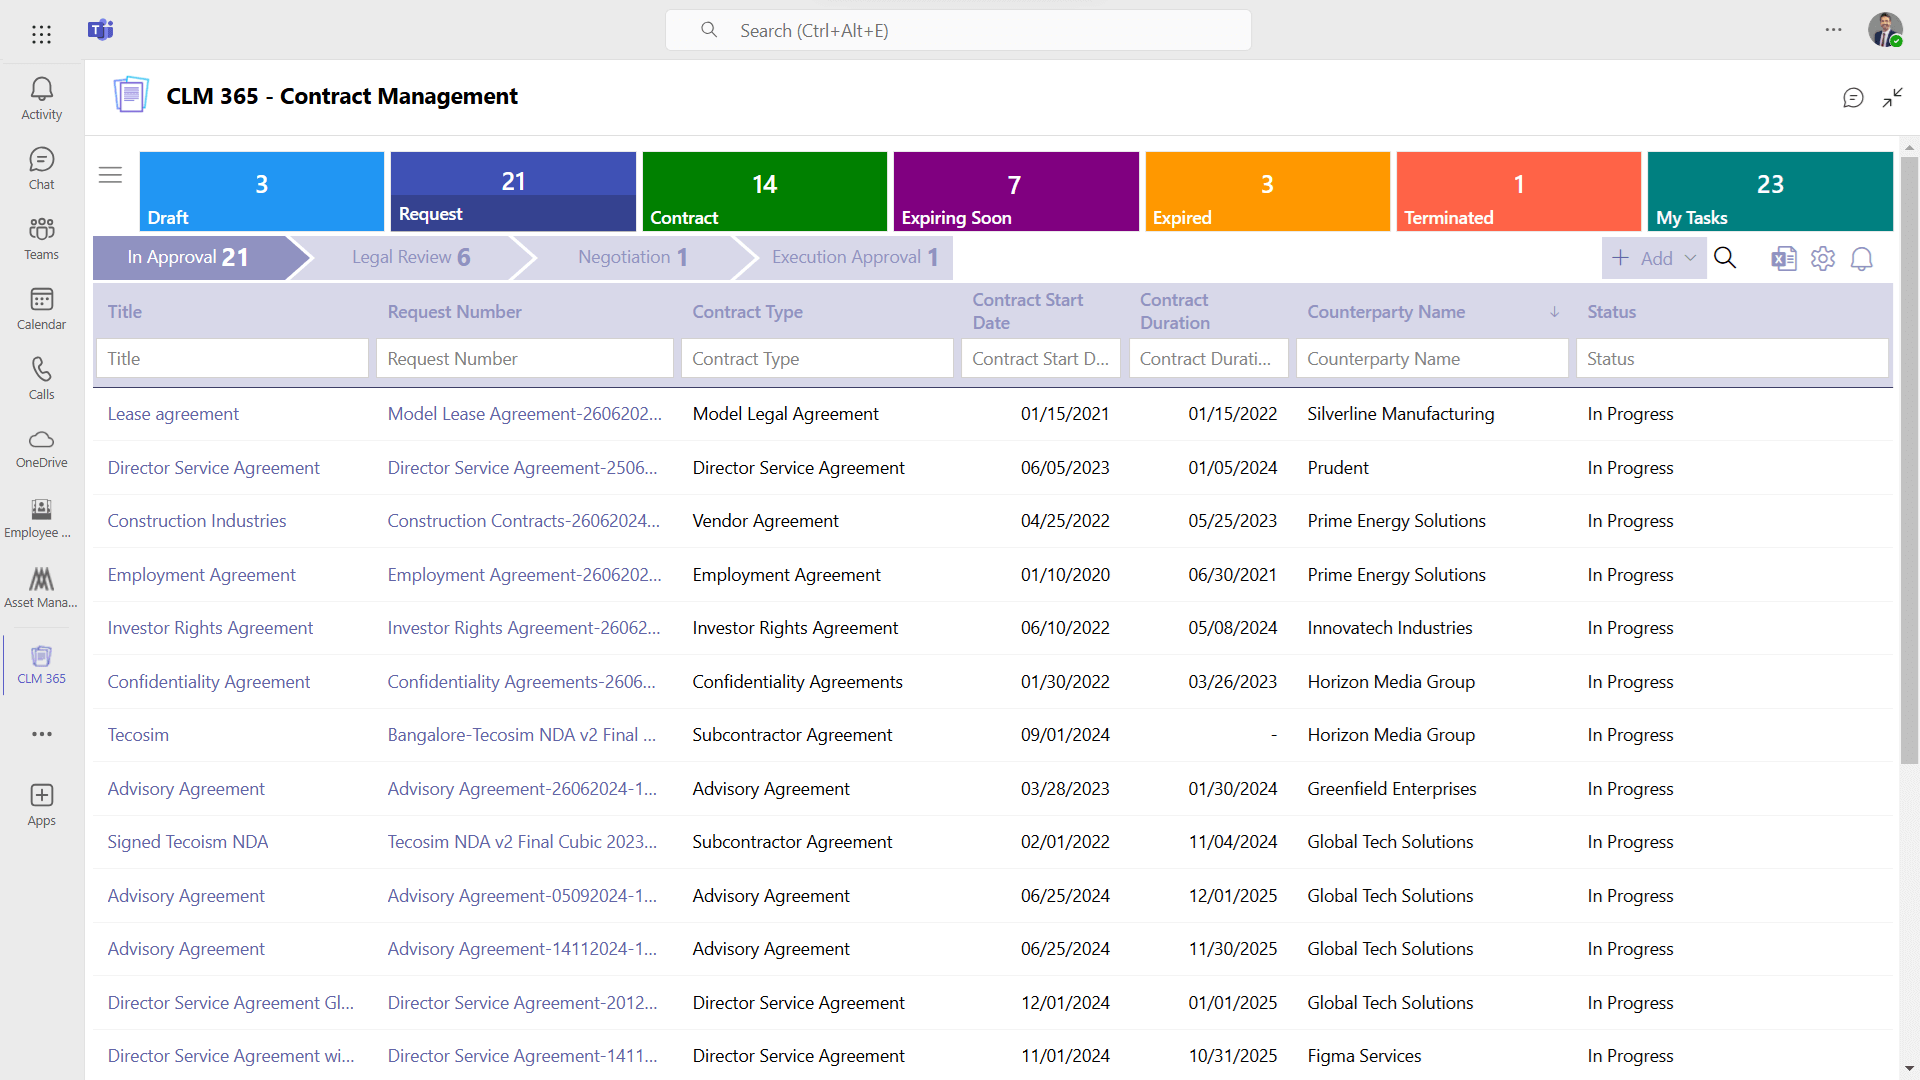
When you centralize your contracts in a SharePoint-based contract management solution, you’re taking the first step towards uncovering the blind spots that can cost your business dearly.

Without a clear view, you’re exposed to potential risks, and compliance issues can slip under the radar. With a SharePoint-based system, you can easily track key dates, milestones, and deadlines, ensuring you’re always on top of your contractual commitments.

You’ll also gain real-time visibility into contract performance, enabling you to identify areas for improvement and optimize your agreements.

Moreover, you can create custom dashboards and reports to provide stakeholders with actionable insights, facilitating data-driven decision-making. By enhancing visibility and transparency, you’ll reduce the likelihood of contractual disputes, and build stronger, more collaborative relationships with your vendors and partners.

Streamlining Approval Workflows

By establishing a clear understanding of your contractual landscape, you can now turn your attention to streamlining the approval process.

This is where a SharePoint-based contract management system really shines. You can create custom workflows that automate the approval process, ensuring that all necessary stakeholders are involved and that their feedback is properly documented.

This not only saves time but also reduces the likelihood of miscommunication or oversight.

With a SharePoint-based system, you can set up alerts and notifications to keep stakeholders informed throughout the approval process.

This means that everyone involved is on the same page, and you can avoid costly delays. Additionally, you can establish clear approval hierarchies, ensuring that the right people are reviewing and approving the right contracts.

Reducing Contract Risk Exposure

Your contract portfolio is a treasure trove of risks waiting to be uncovered.

You mightn’t even realize the potential pitfalls hidden within your contract terms, obligations, and clauses.

Without a robust contract management system, you’re vulnerable to costly oversights, missed deadlines, and non-compliance.

You need a system that helps you identify and mitigate risks proactively.

A SharePoint-based contract management system allows you to centralize your contracts, track key dates, and set reminders for critical milestones.

With automated alerts and notifications, you’ll never miss a deadline or critical contract events.

The system also enables you to set access controls, so only authorized personnel can view or edit sensitive contract information.

Improving Audit and Compliance Readiness

You’ve mitigated risks, now it’s time to ensure you’re prepared for audits and compliance checks.

With a Sharepoint-based b2b saas contract management software system, you’ll have a single, unified platform to manage all your contracts and related documents.

This centralized repository enables you to easily track and monitor contracts, ensuring you’re always up-to-date on terms, obligations, and renewal or expiration dates.

You’ll also be able to quickly locate and retrieve specific contracts or documents, which is essential during audits and compliance reviews.

Additionally, with automated workflows and approval processes, you can ensure that all contracts are properly executed and approved, reducing the risk of non-compliance.

Conclusion

You’ve got a centralized platform that automates contract lifecycle, enhances visibility, streamlines approval workflows, reduces contract risk exposure, and improves audit readiness. By implementing a SharePoint-based contract management system, you’ve significantly improved your business’s overall performance. You’re now better equipped to minimize errors, reduce audit risk, and optimize contract management. You’ve taken a huge step forward in improving compliance and efficiency.

Tree Pruning 101 When and How to Trim Your Trees Safely

As you stand before your trees, pruning shears in hand, you’re likely wondering where to start. You’ve heard that pruning is essential for their health, but you’re not sure when to do it or how to do it safely. You’ve seen the pros at work, effortlessly trimming branches with what looks like a magic touch. But you don’t have to be a pro to get it right. With a few key tips and some practice, you can learn to prune your trees like a pro, and we’re about to show you how. O Kennedy Tree Care.

Understanding Tree Pruning Basics

As you stand beneath the canopy of your prized possession, its sprawling branches stretching towards the sky like nature’s own work of art, the importance of tree pruning basics can’t be overstated.

You’ve invested time, effort, and resources into nurturing your tree, and pruning is essential to maintaining its health, structure, and aesthetic appeal. Pruning involves cutting or removing specific branches or stems to improve air circulation, reduce disease risk, and promote healthy growth.

It’s crucial to identify the reasons for pruning, whether it’s to remove dead or damaged branches, control size, or enhance the tree’s natural shape.

You’ll need to determine the best pruning technique for your tree species, taking into account factors like growth patterns, branching habits, and flowering or fruiting cycles.

Choosing the Right Pruning Tools

You’ve got a solid grasp of tree pruning basics, now it’s time to equip yourself with the right gear.

Pruning tools are essential for making clean cuts and maintaining your safety. You’ll need a pair of hand pruners, also known as secateurs, for cutting branches up to ¾ inch in diameter.

For thicker branches, use loppers, which have longer handles and more powerful blades.

Pole pruners, consisting of a pruning saw or loppers on a pole, allow you to reach high branches without using a ladder.

A pruning saw is necessary for making precise cuts on thicker branches.

Make sure your tools are sharp, clean, and well-maintained to prevent spreading diseases and making clean cuts.

When selecting tools, choose ones with comfortable grips, as they’ll reduce fatigue during extended pruning sessions.

Additionally, wear protective gear, including gloves, safety glasses, and a hard hat, to ensure a safe and successful experience.

Best Times of Year to Prune

Three key seasons dictate the best times of year to prune: winter, spring, and late summer/early fall.

You’ll want to prune in winter when your trees are dormant. This is usually from December to early March, depending on your location. Pruning during this time helps promote healthy growth in the upcoming season.

In spring, prune right after blooming, typically from late March to early May. This helps maintain the tree’s natural shape and encourages blooming.

Pruning in late summer/early fall, from August to early November, helps prepare your trees for the harsh winter months ahead. Prune any weak or damaged branches to prevent damage from snow and ice.

Keep in mind that some trees, like oak and elm, are more prone to disease if pruned during active growth seasons, so it’s best to prune them during their dormant season.

Essential Safety Precautions

Now that your trees are pruned and ready for the seasons ahead, it’s time to focus on the most important aspect of pruning: your safety.

You’re about to work with sharp tools, climb ladders, and navigate branches that can break or fall. It’s crucial you take precautions to avoid injuries and fatalities.

First, wear protective gear, including a hard hat, gloves, and non-slip boots.

Remove any loose jewelry or accessories that could get caught in branches or tools.

Ensure your ladder is on a level surface, securely positioned, and tied to the tree if necessary.

Always maintain three points of contact with the ladder, whether it’s two hands or one hand and two feet.

When using pruning tools, keep your hands and feet away from the cutting area.

Cut outside the branch collar, and avoid cutting towards your body.

If you’re unsure about any aspect of the tree or the pruning process, don’t hesitate to seek professional help.

Your safety is worth the investment.

Pruning Techniques for Success

Pruning techniques make all the difference between a well-manicured tree and a mess.

You’ll want to master the three main techniques: reduction, thinning, and removal. Reduction reduces the size of a branch or the tree as a whole. Thinning involves removing select branches to let air and light reach the areas that need it.

Removal involves taking out entire branches or stems, usually for dead, diseased, or crossing branches.

When pruning, you’ll also want to consider the angle and location of your cuts. Always cut outside the branch collar, the raised area where the branch meets the trunk.

Cutting too close to the trunk can cause damage. Cut at a 45-degree angle, and don’t leave stubs. Make clean cuts, and don’t tear the bark.

Conclusion

You’ve made it! Now you’re equipped with the fundamentals of tree pruning. Remember to prune at the right time, with the right techniques, and with caution. By doing so, you’ll maintain healthy, thriving trees that enhance your outdoor space. Keep your pruning skills sharp, and your trees will thank you.

The Power of CEO Branding (7)

The Power of CEO Branding: Why the Face Behind the Business Matters

In an age where consumers crave authenticity and trust, CEO branding has emerged as a critical strategy for modern businesses. No longer confined to the boardroom, CEOs are stepping into the spotlight—becoming the storytellers, the culture drivers, and the trusted faces of the brands they lead.

Whether you're a startup founder or the head of a Fortune 500 company, CEO branding is more than a trend—it's a business asset.

What Is CEO Branding?

CEO branding is the process of strategically building and promoting a CEO’s personal brand to align with and amplify the values, vision, and reputation of the company they lead. It involves showcasing the CEO's personality, leadership style, opinions, and achievements across platforms like LinkedIn, media interviews, podcasts, conferences, and social media.

It’s not just about visibility—it's about credibility, relatability, and influence.

Why CEO Branding Matters

1. Trust Starts at the Top

According to Edelman's Trust Barometer, people are more likely to trust a company when its leadership is transparent and visible. When a CEO shares insights, addresses challenges, or speaks on social issues, it humanizes the business.

2. A Competitive Differentiator

In crowded industries, CEO branding can distinguish your company from the competition. Think Elon Musk, Richard Branson, or Sara Blakely. Their personal brands have added significant value to their companies.

3. Media & Speaking Opportunities

A well-branded CEO attracts invitations for keynotes, expert commentary, and media interviews. This increases exposure for both the individual and the company.

4. Crisis Management

In times of crisis, a well-respected CEO can calm stakeholders, rebuild trust, and steer the brand through turbulent waters more effectively than anonymous press releases.

5. Employee Engagement

Employees want to work for leaders who inspire them. A CEO who communicates clearly, shares company goals, and shows personality can boost morale and attract top talent.

Key Elements of a Strong CEO Brand

Authenticity

: Be real. Audiences can spot a fake.

Consistency

: Maintain a uniform voice and message across platforms.

Thought Leadership

: Share opinions, insights, and experiences to establish authority in your industry.

Visibility

: Leverage multiple platforms—LinkedIn, blogs, podcasts, video—to connect with different audiences.

Alignment with Company Values

: Your brand should reflect and reinforce your company’s mission and culture.

CEO Branding in Action

Here are a few real-world examples of CEO branding:

Satya


Nadella

(Microsoft)

: Positioned himself as a thoughtful, empathetic leader focused on innovation and diversity.

Whitney Wolfe Herd (Bumble)

: Showcased her journey as a tech founder advocating for women’s empowerment.

Gary

Vaynerchuk

(

VaynerMedia

)

: Blended personal storytelling with marketing expertise to create a loyal online following.

How to Start Building Your CEO Brand

Audit Your Online Presence

– Google yourself. What do people see?

Define Your Brand Pillars

– Identify 3-5 key topics you want to be known for (e.g., leadership, innovation, sustainability).

Create a Content Strategy

– Regularly share content that reflects your values and expertise.

Engage Your Audience

– Respond to comments, join conversations, and show genuine interest.

Seek Media Coverage

– Work with PR professionals to land interviews and features.

Final Thoughts

CEO branding is no longer optional—it’s essential. A strong personal brand builds trust, drives business growth, and opens doors to new opportunities. By being intentional, authentic, and strategic, CEOs can turn their name into one of their company’s most powerful assets.


Hair Transplant Techniques Fue Vs. Fut Which Is Right For You?

As you consider hair transfer techniques, you’re likely questioning which set about is best for you. You’ve probably heard of FUE and FUT, but what are the key differences? Both methods have their advantages, but it’s requirement to sympathize how they’ll touch your unique state of affairs. Will FUE’s cancel-looking hairline and token scarring be the way to go, or will FUT’s potentiality for higher denseness and spectacular transmutation win out? The do depends on your mortal hair loss patterns, the come of hair to be transplanted, and your personal preferences. Now, it’s time to research these options further to determine the best fit for your needs.

Understanding FUE Hair Transplant

You’re likely considering a hair transplant to address thinning or hairless areas on your scalp, and FUE(Follicular Unit Extraction) is one of the most popular techniques used nowadays.

This method involves extracting individual hair follicles from the back and sides of your head, which are then transplanted to the hairless areas. FUE is a minimally invasive subroutine that doesn’t require a lengthwise incision, consequent in less scarring and a faster recovery time.

During the procedure, your doctor will use a technical tool to extract follicles, typically in a random pattern to maintain a cancel-looking hair increment.

The extracted follicles are then cleft into individual grafts, which are implanted into the hairless areas. FUE is nonpareil for those with mild to tone down hair loss, as it allows for a more meticulous verify over the come of grafts transplanted.

Additionally, FUE can be used to repair scars from previous hair transplants or other preoperative procedures. With FUE, you can a cancel-looking hair growth that will last for age to come.

FUT Hair Transplant Procedure Overview

Your hair restoration travel may also demand FUT, or Follicular Unit Transplantation, a technique that’s been around for decades and remains a pop selection for many individuals.

This method acting involves harvest home hair follicles from the back and sides of your head, where your hair is typically thicker and more resistant to hairless.

During the subprogram, your doctor will transfer a disinvest of hair-bearing skin from the presenter area, typically from the back of your head.

This strip is then dissected into person grafts, each containing 1-4 hair follicles.

The grafts are then transplanted to the balding areas of your scalp.

You’ll be under local anesthetic anaesthesia during the function, which usually takes several hours to nail.

You may see some discomfort and swelling after the routine, but these side effects are typically mild and temporary worker.

Your will provide you with post-operative operating instructions to see to it a smooth retrieval and optimal results.

Comparing FUE and FUT Results

What can you expect from FUE and FUT in terms of results?

Both techniques can produce cancel-looking hair increase, but there are some differences to consider.

With FUE, you can a more subtle, natural-looking hairline, as the grafts are extracted individually and placed in a way that mimics your natural hair increment pattern.

FUT, on the other hand, can create a more impressive transmutation, as a big segment of hair-bearing skin is transplanted.

However, this may result in a more strong running scar on the back of your head.

In price of denseness, FUT can often achieve higher density in the transplanted area, as four-fold grafts can be harvested from the presenter divest.

FUE, while still operational, may need two-fold Sessions to reach the same dismantle of denseness.

Ultimately, the selection between FUE and FUT will count on your soul hair loss needs and goals.

Your will help you which proficiency is best suited to achieve the results you’re looking for.

Post-Operative Care and Recovery

Following the hair transplant subprogram, taking specific care of the transplanted area is crucial to control optimal results and understate the risk of complications.

You’ll need to watch your ‘s operating instructions with kid gloves to reach the best possible resultant. Typically, this involves retention the transplanted area dampish with a saline solution root or specialized shampoo, and avoiding target sun for a few days.

You may also need to take pain medicament or antibiotics as oriented to finagle uncomfortableness and prevent infection.

During the first few days, you may see some swelling, redness, or bruising around the transplanted area.

This is normal and should subside on its own within a week or so. You’ll need to keep off energetic activities, such as heavily lifting or exercise, for about a week to understate the risk of bleeding or lump.

Your doctor will supply you with a careful recovery plan, including watch over-up appointments to monitor your progress and remove any sutures or stitches.

Choosing the Right Technique for You

Hair transfer techniques have evolved significantly over the years, offer a range of options for individuals quest to restore their hair.

When considering a hair transpose, you’ll need to settle which technique is right for you. You should consider your hair loss model, the come of hair you’re willing to transfer, and your personal preferences when qualification this .

If you’re looking for a more natural-looking hairline with marginal scarring, FUE might be the way to go. This proficiency involves extracting individual follicles, allowing for a more pinpoint and whippy transfer process.

On the other hand, if you’re looking to transplant a big add up of hair and don’t mind a running scar, FUT could be the better pick. This proficiency involves removing a undress of hair-bearing skin, which is then dissected into individual grafts.

Ultimately, the right proficiency for you’ll look on your unusual needs and goals. It’s essential to refer with a qualified hair restoration specializer to the best set about for your someone case.

Conclusion

You’ve weighed the pros and cons of FUE and FUT, and now it’s time to make a . Consider your hair loss pattern, the amount of hair you want to transfer, and your subjective preferences. With the right proficiency, you can attain a cancel-looking hairline that boosts your confidence. Don’t waver to refer a competent hair Restoration specializer to determine the best go about for your individual needs and goals.

Top Equipment Used For Snow Plowing And Clearing In Vancouver

When it comes to tackling Vancouver’s winter wonderland, you’re likely curious about the that gets the job done. From main roads to tight spaces, and from sidewalks to driveways, the right tools are necessary for effective snow ploughing and clearing. You might be inquisitive what sets the top equipment apart, and how they’re used to keep Vancouver moving during the covered months. As you explore the worldly concern of snow , you’ll find that each patch of plays a life-sustaining role- but which ones take the top spot, and why?

Heavy-Duty Plows for Main Roads

Most main roadstead require heavily-duty plows that can clear boastfully amounts of snow quickly and with efficiency.

You’ll need plows that can stand firm harsh overwinter conditions and preserve to execute optimally. Heavy-duty plows are premeditated to wield deep snow and ice, qualification them apotheosis for main roads.

They’re built with fresh frames, high-powered engines, and serviceable blades that can cut through midst ice and snow.

When choosing a heavy-duty plow, you’ll want to consider the size of your crew, the number of roadstead you need to , and the type of snow you typically get.

You may need quintuple plows to wrap up a large area, or you may need specialized plows for specific roads.

Regardless, you’ll want to assure your plows are well-maintained and serviced regularly to prevent breakdowns during critical snow clearing operations.

Salt Spreaders for Ice Control

You’ll need salt spreaders that can undertake icy roadstead, especially on steep hills and bridges where adhesive friction is material.

In Vancouver, ice verify is necessity to ascertain populace refuge. Salt spreaders come in various sizes and types, but for snow ploughing and in Vancouver, you’ll need one that can handle high-volume spreading.

Look for units with changeable spread out patterns and variable star flow controls to understate over-application and tighten situation touch on.

When choosing a salt broadcaster, consider the type of salt you’ll be using. Rock salt, Ca , and Mg chloride all have different practical application rates.

You’ll also want to assure your broadcaster is compatible with your motortruck or fomite’s hydraulic system. Additionally, consider the broadcaster’s capacity, as well as its strength and ease of sustentation.

In Vancouver’s harsh winter conditions, you can’t give to have your salt spreader wear away down or need buy at repairs. By selecting the right salt broadcaster, you’ll be able to keep Vancouver’s roads safe and ice-free throughout the overwinter season.

Skid-Steer Loaders for Tight Spaces

As you’re ensuring Vancouver’s roadstead are safe with the right salt spreader, don’t forget to consider the that’ll help you sail tight spaces.

Skid-steer loaders are hone fit for this task. Their bundle size and zero-turn wheel spoke allow you to access areas that big equipment can’t, qualification them apotheosis for clearing snow from specialise alleys, parking lots, and sidewalks.

With a skid-steer lumper, you can easily swop between attachments, such as a snow pail or a sweep, to tackle different tasks.

This versatility enables you to clear snow speedily and with efficiency, reducing the need for manual push on. Additionally, skid-steer loaders often feature mechanics systems that provide the major power and preciseness necessary to wield heavy snowfalls.

When choosing a skid-steer dockworker, consider factors such as lift , in operation slant, and mechanics flow rate.

Ensure the simple machine can wield the demands of Vancouver’s winter brave and your specific snow removal requirements. By adding a skid-steer lumper to your snow removal armoury, you’ll be well-equipped to take on even the most stimulating tight spaces.

Snow Blowers for Sidewalks and Driveways

When tackling snow remotion on sidewalks and driveways, one requirement patch of equipment is a snow electric fan. You’ll appreciate the ease and it brings to clearing these areas.

Snow blowers are premeditated to wield tone down to heavy snow, qualification them perfect for Vancouver’s climate. They’re also of import for navigating fast spaces, such as between parked cars or along narrow sidewalks.

You’ll want to consider a few key factors when choosing a snow blower. Look for one with a robust engine, as it will cater the great power you need to take on midst snow.

Additionally, consider the ingestion height and breadth, ensuring it can wield the and breadth of your sidewalks and driveways. Some Vancouver Snow Removal blowers also come with features like adjustable parachute way and remote control, allowing you to point the snow exactly where you want it.

With the right snow electric fan, you’ll be able to your sidewalks and driveways quickly and effectively, making it an necessity tool in your snow remotion armory.

Trucks With Plow Attachments for Versatility

By the time winter sets in, having a truck with a plow fond regard can be a game-changer for snow remotion.

You’ll be able to take on big areas, from parking lots to streets, with ease and efficiency. These trucks are premeditated for heavy-duty snow clearing, allowing you to plow through thick layers of snow and ice.

With a truck, you’ll also have the versatility to attach other tools, such as salt spreaders or brooms, to tackle different types of snow and ice.

When choosing a motortruck for snow plowing, consider the size and type of truck you need, as well as the attachment options available.

Look for trucks with four-wheel drive for added adhesive friction and stableness on slippery roadstead. Additionally, consider the mechanics systems that world power the plow, as well as the plow’s stuff and design.

With the right motortruck and plow attachment, you’ll be well-equipped to handle Vancouver’s white winters.

Conclusion

You’ve got the right tools to tackle Vancouver’s white winters. With heavily-duty plows, salt spreaders, skid-steer loaders, and snow blowers, you’re all set for efficient snow ploughing and . Don’t leave trucks with plow attachments for versatility. Proper equipment selection is key to operational snow and minimizing state of affairs touch. Now, get out there and those roads and sidewalks